It’s that time of year again! Hearts – both paper and chocolate – are everywhere, and restaurants are preparing prix fixe menus to share by candlelight. Whether you’re getting ready for a night out with friends, a romantic date, or just cause you feel like getting all glammed up, I’ve put together two easy Valentine’s makeup looks that you’ll …love (sorry, had to!).

{Easy Valentine’s Makeup Looks}
Disclaimer: Many of the products and services mentioned in this post were provided to me at no cost for editorial consideration. All opinions are my own.
The Basics
First things first: before putting on any makeup, be sure you’ve got your winter skincare routine completed. There’s nothing more frustrating than spending half an hour on your look, only to realize that your dry skin is making the pigment flake! Once you’re exfoliated and moisturized, you’re ready to move on to the actual makeup.
While many folks take the opportunity to go full glam on Valentine’s, I like to keep things a little more low-key. The looks I’ve created this year are simple to put together, and don’t require many products. After all, it’s always fun to play with makeup and create dramatic looks, but sometimes other things take priority (like nachos).
For both of these easy Valentine’s makeup looks, I’m wearing my Mix Beauty Lab custom foundation ($65), Marcelle Cosmetics Nano Eyebrow Pencil in Blond ($11.99), and Make Up For Ever’s Artist Face Color in S-114 ($29 individually). I’m not wearing any mascara in these pictures, since I got eyelash extensions from Pretty in the City just over 3 weeks ago, and they’re still looking positively dreamy.

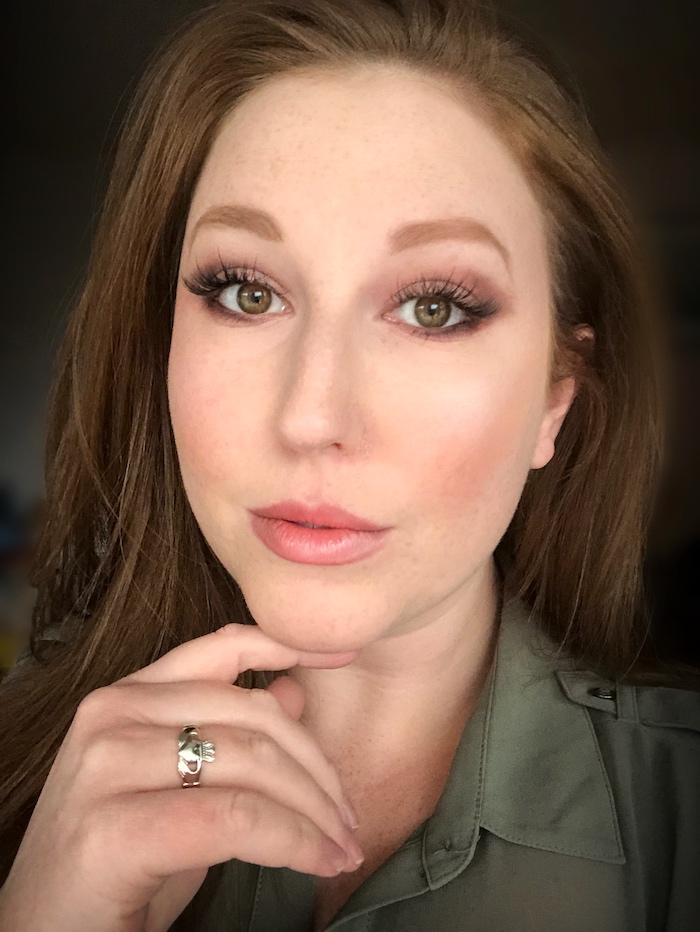
Look #1: Sultry Smokey
This look is all about eyes and glow. Play with shadows that complement your eye colour for extra impact.
Products used: Caryl Baker Visage Nordic Beauty Blushadow Quad in Cozy ($29.50), Caryl Baker Visage single eyeshadows in Stone and Faith ($18 each), Stila Heaven’s Hue Highlighter in Kitten ($42), Mix Beauty Lab custom lip gloss ($40)
Get the look:
- Create a base by applying foundation and concealer, then setting with powder
- Draw on or fill in eyebrows, as needed
- Find your natural cheekbone and apply bronzer or contour along the hollow directly underneath, following the bone up towards your ear
- Smile to find the apples of your cheeks, and apply blush, blending into the bronzer and up towards your temples to ensure a smooth curve (I used a kabuki brush to swirl together all 4 colours of the Blushadow quad, and used that as my blush)
- Apply highlighter directly on top of cheekbone, on browbone, and bridge of nose
- Eyes:
- Cover lid with a neutral shade, exaggerating your eye shape outwards
- Apply medium shade along lower lash line, extending diagonally past eye (I used the darkest shade in the Blushadow quad for this)
- Smoke outer corner with a dark shade, blending inwards along crease
- Use medium shade again, blending over top of grey/black to smooth the transition between it and the neutral shade
- Finish off with lip gloss or lip balm
It can seem overwhelming to apply this much shadow, but the “smokey” effect really just requires 3 different colours. The lightest goes over the entire lid and past your crease to create the shape you want; the medium shade goes along your lower lash line to create the sultry effect, and then blends from your outer corner inwards to reinforce the exaggerated eye shape; and the darkest shade is applied at the outermost point of your shape and blended with the other colours to create the illusion of depth.

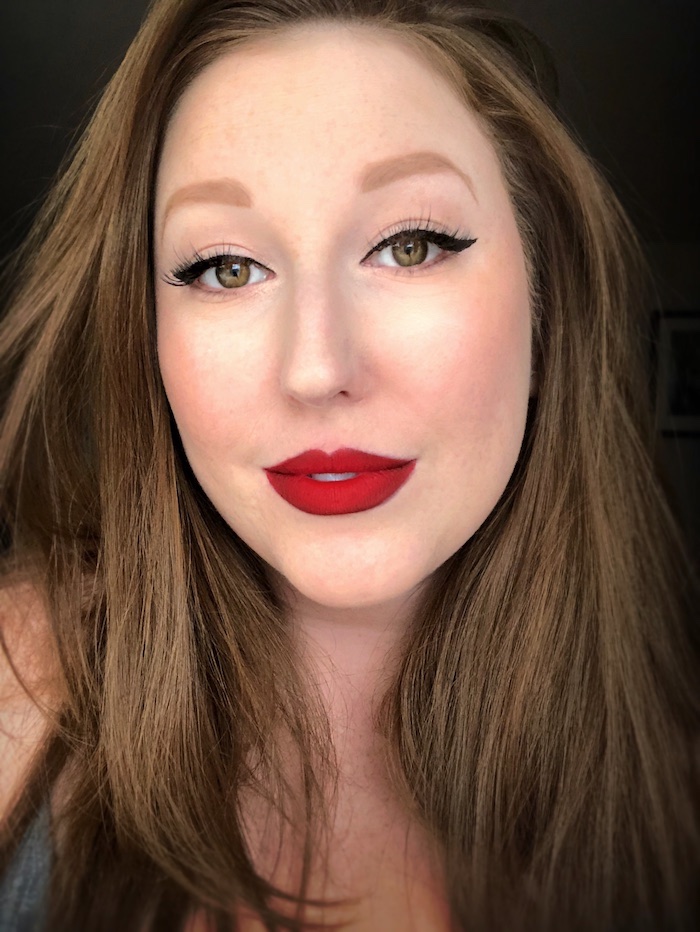
Look #2: Ombré Lip
This is your classic winged-liner-and-red-lips look, with a slight twist. To make those lips look even more kissable, try an ombré effect. Now, before you have panic flashbacks to the early 90s “brown liner with pink lipstick” trend, let me reassure you: the modern ombré lip is much more subtle. Just like with a smokey eye, you’re playing with light and dark to create depth. The result? Lips that look full, shapely, and absolutely luscious.
Products used: Stila Stay All Day Waterproof Liner in Intense Black ($29), Sephora Collection Cream Lip Stain in Always Red ($18), Givenchy Universel Noir Révélateur Lip Liner ($36).
Get the look:
- Create a base by applying foundation and concealer, then setting with powder
- Draw on or fill in eyebrows, as needed
- You want your lips and eyes to be the focus here, so keep blush and contour to a minimum
- Eyes:
- Starting at the inner corner of the eye, use liner to trace along natural eye shape
- To create wing, draw diagonal line upwards and out from outer corner
- Connect top of diagonal line back to the line you already drew on your lid, creating a tiny triangle
- Fill in the triangle and re-trace along lid to add thickness, as desired
- Lips:
- Using dark liner, trace full shape of lips
- On top lip, shade in corners and top of cupid’s bow with liner (leaving middle area untouched)
- On bottom lip, shade in corners and along base of lip with liner (leaving the middle area untouched)
- Apply red lipstick over full lip, gently rubbing lips together to blend as needed
Using a matte liquid lipstick is key here, as shine can undercut the effect, and a solid lipstick won’t blend as smoothly. You can also adjust the ombré as needed by adding more liner or lipstick to darken or lighten.
And there you have it! Two makeup looks that take minimum effort but deliver mega impact.

1 thought on “Easy Valentine’s Makeup Looks”