A few months back I was contacted by the people at Bio Seaweed Gel who kindly remembered me from the French Connection Style Stage at ANTM Live last year.
Now I’ve done shellac manicures before and I really like the results. However taking the product off is a bit of a pain and I’m weary about doing it too often for fear that my nails would be permanently ruined. Apparently Bio Seaweed Gel solves these problems as it claims to be “healthy” for the nails.
Now I know that there are some salons that use this product so when you go in for a shellac manicure or pedicure you can usually request the Bio Seaweed Gel products at no additional charge. I was actually sent a kit to do my own nails at home!
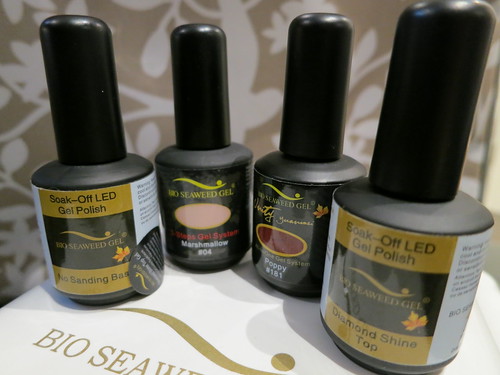
From left to right:
Base coat // Polish in “Marshmallow” // Polish in “Poppy” // Top Coat
(Base and top coats are $20 and colours are $18 on sale)
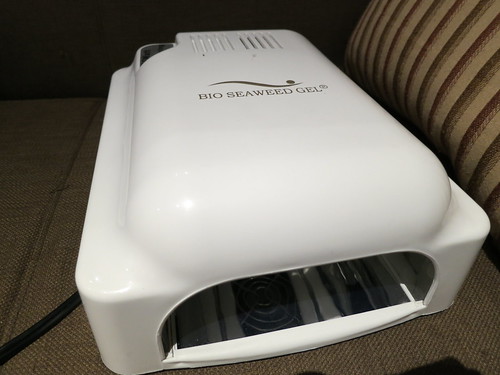
UV Lamp
($120 – 9W replacement bulb $10)
Application:
The coloured polishes are suppose to be an all in one – no need for base and top coat. But since I was sent the base and top coat I used them anyway! (I found out afterwards that you can use the base and top coat especially if you want to keep the same colour on for longer. A good option before going on vacation).
I applied the base coat first then turned the lamp on for 2 minutes. Then followed the same steps for the colour and then the top coat. When I usually do my nails I do my left hand first then my right hand then follow the next steps. In this case I did one hand completely first as you don’t have use of your hand when it’s under the lamp LOL!
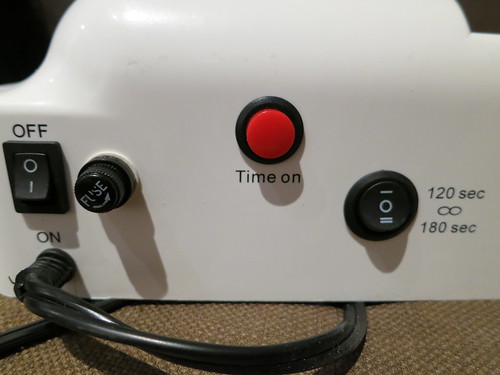
Working the lamp is really easy. On the back there are two timer settings and an on/off switch. All you do is push the red button with your hand (or foot!) under the lamp and when it turns off you’re good to move on to the next step.
I’m not sure if I did something wrong but when I get my nails done at the salon they are perfectly dry after the last step. I assumed my nails were dry so I went to grab a blanket for my cat and my nails were full of cat hair stuck to them!
I figured that I must have done something wrong so I quickly tried to use pure acetone to take the polish off and start again. Interestingly enough when I wiped acetone on the polish with a cotton pad no colour came off but my nails were then perfectly shiny and dry! I honestly cannot tell you why this happened but since I don’t need a base or top coat I think the next time I will try it with just the colour. This will save me time as well! {EDITOR’s NOTE: I was told that you are supposed to clean the nails with alcohol after the last step to remove the stickiness – which is what I didn’t do prior to picking up a blanket full of cat hair! Lesson learned.}
The Results:
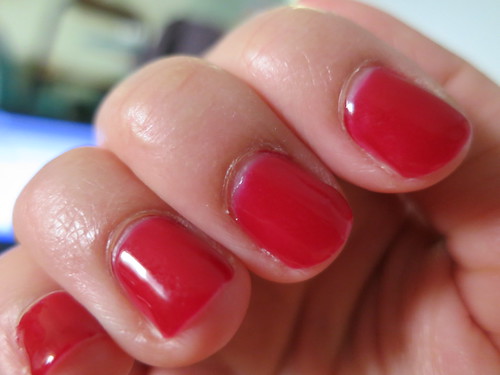
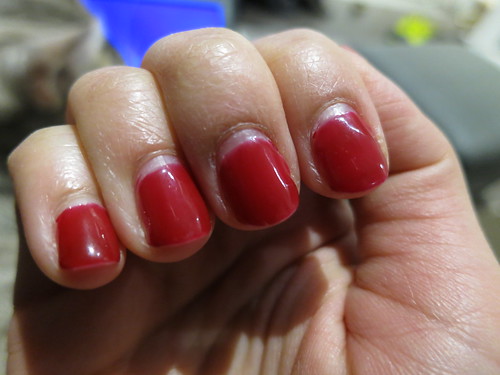
Here are my nails about day after I first did them (it slipped my mind to take a picture right when I was done as I was leaving for vacation the next morning!)
The colour is really shiny and smooth. (I’m actually impressed with myself at how neatly I managed to apply the polish!)
And here is after almost 2 weeks:
My cuticles are pretty dry after coming back from sunny/humid Florida to our cold weather here. The polish is a bit dull and has some dents and started to peel in certain areas but overall it still looked really good!
Removal:
I get really lazy when I have to remove my nail polish. I know, I know, it looks hideous when half the nail polish is gone – I admit I’m guilty of this! To tell you the truth I was worried about the removal process as I know what a pain it is to remove shellac polish (without going to the salon).
What I DID like about this is that when the polish started to peel it was actually really easy to remove cleanly. There was no real residue and minimal dehydration and “rough spots” on the nails. The only problem was that the polish did not begin to peel at the same rate for all my nails so I still needed some acetone to take it off.
I soaked a cotton pad in acetone and applied to my finger tips holding for a few minutes. The polish scraped off quite easily although my nails and hands were super dry from the acetone.
The polish on my toes came off even easier – I just peeled it all away cleanly! I did leave the polish on my toes on longer though as we are fully in sock season now and I wasn’t worried about people seeing badly polished toes 😉
Wrap up:
Overall I really like this system! Did it save me time? Since I applied all the steps and had issues with cat fur sticking to my nails – no. Sitting for 2 minutes in between each coat is a bit of a pain however I think the next time I try this I will stick to the one step process so that will save me time for sure! Also to note, the consistency of the product is thicker than regular nail polish so you need to apply with a light hand or you could end up with super thick layers on the nails. I would DEFINITELY use this system again especially before a vacation so I don’t have to worry about chipping polish. There are also a TON of colours with new colours added each season so it’s nice that there are a lot of options.
I also think the price is reasonable. For about under $200 you can purchase the lamp and one coloured polish (after taxes) but save yourself money in the long run with trips to the salon. I’m sure like me you’ll probably still indulge in a trip every now and then (who doesn’t like to be pampered) but in between those trips your nails can still look professionally done!
So where can you get Bio Seaweed Gel products? An
online shop launched recently which offers $15 flat rate shipping in the US and Canada. It can also be purchased at their storefront location in downtown Toronto at
415 Yonge Street Unit 103, Toronto. (416-916-9223). For distributors you can find a list on their
website. AND right now use the code “
STARTER” to get 1 base gel and 1 top gel FREE when you purchase the UV lamp online.
But…how would you like to win a system of your own?
All you have to do is be a Canadian reader and fill out the Rafflecopter form below. Good luck!
a Rafflecopter giveaway


